When I looked into going light, I saw that I would benefit most from a different tent. I had been using a conventional tent that weighed in at around five and a half pounds -- not a back-breaker, but I thought I could save a pound or two with a new tent. After looking at a number of different designs, I was drawn to the Six Moon Designs' Lunar Duo and the Nemo Meta 2P because of their simplicity and aesthetic appeal. Those two tents also met my only "must haves": (1) they fit two people and (2) they were fully enclosed tents. I backpack with my fiancee so any tarp shenanigans are out of the question.
During that time, I had also been poking around BackpackingLight.com's "do it yourself" forum. After some research and consideration, I figured making my own tent would be a doable project.
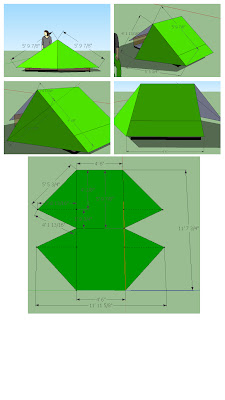
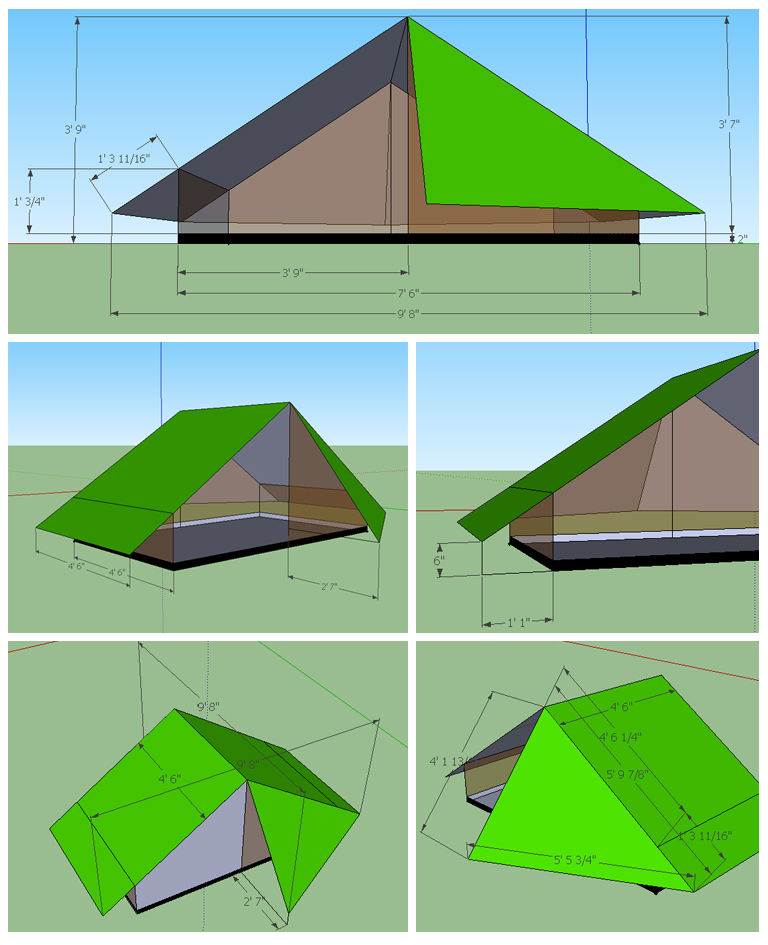
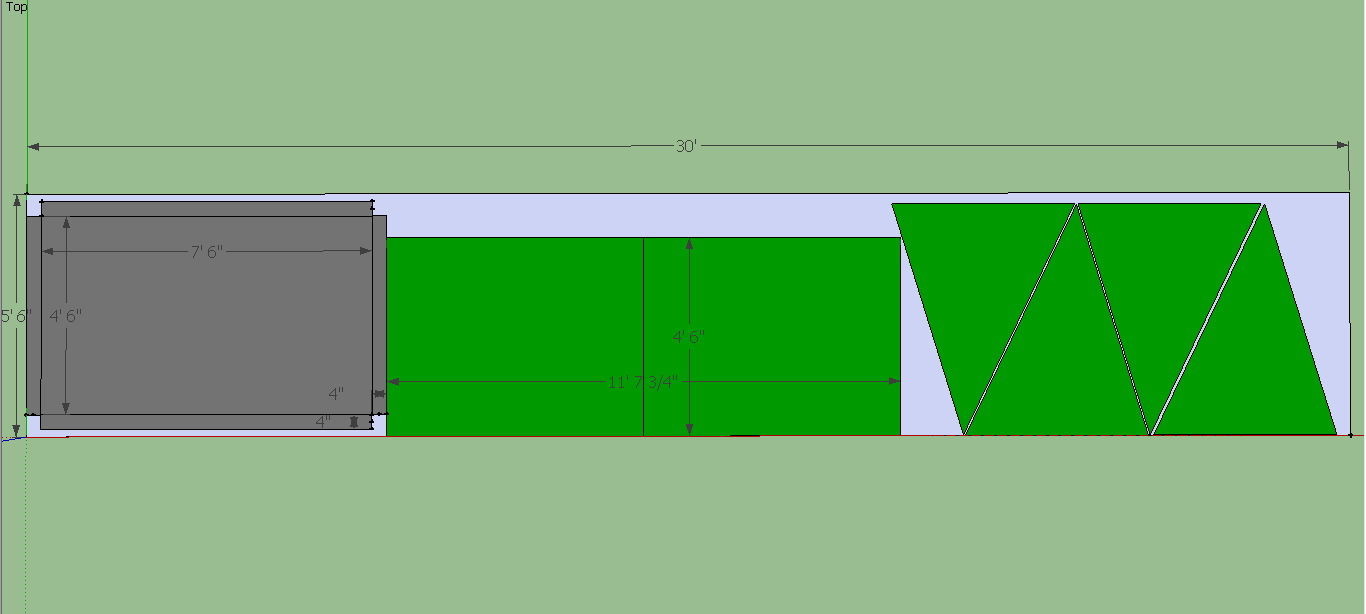
The first step was to draw up the design. I used Google's SketchUp and it was perfectly fine for my purpose. Here's what I came up with:


.jpg)


 Next, I went off to Ebay and snagged most the important materials: silnylon and no-see-um mesh. Here's the breakdown of materials and components:


Once completed, the seams need to be sealed using a silicone-based sealant. My personal preference is to use Permatex Flowable Silicone, which can be purchased at any auto-supply store. It's primarily used to seal windshield wipers, but it works great for tents because it's just the right consistency -- you don't need to dilute it with water or anything. I also use it to fix pinprick holes.
After a number of seasons on the trail, I'm very happy with the tent and my design. At 38 oz, it's reasonably light. The tent is also very spacious -- plenty of room for two and maybe three if in a pinch. The double entries and vestibules are great for accessing your items and leaving the tent without disturbing your partner. Here are a couple pictures of it on the trail:


During that time, I had also been poking around BackpackingLight.com's "do it yourself" forum. After some research and consideration, I figured making my own tent would be a doable project.
The first step was to draw up the design. I used Google's SketchUp and it was perfectly fine for my purpose. Here's what I came up with:

.jpg)


- 10 yards of 1.1 oz silnyon - $55.00 + $5.50 shipping
- 10 yards of no-see-um/mosquito tent netting - $17.95 + $5.00 shipping
- 2 x 6 feet sleeping bag zippers - $10
- Permatex Flowable Silicone Windshield Seal (to seal the seams on the tents and fix minor nicks) - $4.99
- Webbing/rope - free scraps.
Construction was fairly straight forward. As you cans see from my drawings, I chose not to incorporate catenary curves in the design, which made it a lot easier to sew. The most important thing about sewing is to make sure the pieces of fabric are folded over before being sewn together for additional strength, like so:

Another thing to remember is to reinforce all loading points, as shown below (thanks to Henry Shires):
Once completed, the seams need to be sealed using a silicone-based sealant. My personal preference is to use Permatex Flowable Silicone, which can be purchased at any auto-supply store. It's primarily used to seal windshield wipers, but it works great for tents because it's just the right consistency -- you don't need to dilute it with water or anything. I also use it to fix pinprick holes.
After a number of seasons on the trail, I'm very happy with the tent and my design. At 38 oz, it's reasonably light. The tent is also very spacious -- plenty of room for two and maybe three if in a pinch. The double entries and vestibules are great for accessing your items and leaving the tent without disturbing your partner. Here are a couple pictures of it on the trail:


Please feel free to ask me any questions if you'd like detail on any part of this project.


